HTTP Status Codes Easy Guide: 100s to 500s Cheat Sheet

The 5 Classes of HTTP Status Codes Cheat Sheet

To simplify things, HTTP Status Codes were grouped into 5 classes by the IETF (Internet Engineering Task Force) when the standards were created. Here’s a quick breakdown of these classes:

  • 100s: These are informational codes that show the request from the browser is still in progress.
  • 200s: These success codes indicate that the server has received, understood, and processed the browser’s request.
  • 300s: These redirection codes are used when a new location is provided for the requested resource.
  • 400s: These client error codes signal issues with the request made by the browser.
  • 500s: These server error codes mean the server accepted the request but encountered an error preventing it from being delivered.


List of HTTP Status Codes Cheat Sheet

100 Status Codes – Informational Responses

100 informational response

100 informational response

  • 100: Continue – This code means the server has received your browser’s request headers and is ready to receive the request body.

  • 101: Switching Protocols – Indicates that your browser has requested the server to change protocols, and the server has agreed.

  • 103: Early Hints – Provides some response headers before the final HTTP message is sent.

200 Status Codes – Success Responses Cheat Sheet

200 success

200 success

  • 200: OK – The standard response for successful HTTP requests.

  • 201: Created – Indicates that the request has been fulfilled and a new resource has been created.

  • 202: Accepted – The request has been accepted for processing, but it’s not yet completed. The request might or might not be acted upon and could be rejected later.

  • 203: Non-Authoritative Information – This code appears when a proxy server, which received a 200 OK response from the origin server, has modified the response before passing it to your browser.

  • 204: No Content – The server has successfully processed the request but will not return any content.

  • 205: Reset Content – Similar to the 204 code, the server has processed the request successfully, but it will not return content, and the document view will be reset.

  • 206: Partial Content – This code is used when a range header causes the server to send only part of the requested resource, useful for resuming downloads or splitting them into multiple streams.

300 Status Codes – Redirection Responses Cheat Sheet

300 redirection

300 redirection

  • 300: Multiple Choices – Indicates that there are multiple options for the server to respond with to fulfill the request. Your browser must choose between these options, such as different file formats or resources.

  • 301: Moved Permanently – The requested resource has been permanently moved to a new location. This code is used for permanently redirecting URLs from one location to another.

  • 302: Found – The resource requested has been moved temporarily. The code indicates that the resource was found, but not at the location expected. It’s used for temporary URL redirections.

  • 303: See Other – This code informs your browser that the resource can be found via a different HTTP request method. For example, after using POST, PUT, or DELETE, you should use GET to retrieve the resource from a different URL.

  • 304: Not Modified – The resource has not changed since the last time you accessed it. This code tells your browser it can use the cached version of the resource.

  • 307: Temporary Redirect – Replaces the 302 code for temporary redirections. It tells the browser that the resource has been temporarily moved to a different URL, and it should use the same method for future requests.

  • 308: Permanent Redirect – Serves as an update to the 301 code, indicating that the resource has been permanently moved to a new URL.

400 Status Codes – Client Error Responses Cheat Sheet

400 client errors

400 client errors

  • 400: Bad Request – This code means the server cannot return a response due to an error on the client’s side.

  • 401: Unauthorized – Indicates that access to the resource is denied because proper authorization credentials are missing. If using htpasswd authentication, you’ll see this error if login details are incorrect.

  • 402: Payment Required – Originally intended for a different use, this code now indicates payment issues on some platforms, such as exceeding API request limits or unpaid service fees.

  • 403: Forbidden – Returned when access to the requested resource is denied. Commonly seen if trying to access protected content without proper login.

  • 404: Not Found – The requested URL or content is not on the server. This is the classic “Page Not Found” error.

  • 405: Method Not Allowed – This code is used when the server supports the request method, but the target resource does not.

  • 406: Not Acceptable – The resource can only generate content that is not acceptable based on the request’s accepted headers.

  • 407: Proxy Authentication Required – A proxy server requires authentication from your browser to continue.

  • 408: Request Timeout – The server timed out waiting for the rest of the request from the browser.

  • 409: Conflict – Occurs when the server cannot process the request due to a conflict with the resource, often due to simultaneous edits.

  • 410: Gone – Indicates that the requested resource is permanently gone and will not return, distinguishing it from a 404 error by indicating that this is expected.

  • 411: Length Required – The server requires a specific length to be specified by the client, but it was not provided.

  • 412: Precondition Failed – The server did not meet the conditions specified in the request headers.

  • 413: Payload Too Large – The request is larger than what the server is able to process.

  • 414: URI Too Long – The request URI is too long for the server to process, usually from a large query string.

  • 415: Unsupported Media Type – The server does not support the media type of the request.

  • 416: Range Not Satisfiable – The request was for a portion of a resource that the server cannot return.

  • 417: Expectation Failed – The server cannot meet the requirements of the Expect request header field.

  • 418: I’m a Teapot – An April Fools’ joke code indicating that a teapot refuses to brew coffee.

  • 422: Unprocessable Entity – The server cannot process the request due to semantic errors in the client’s request.

  • 425: Too Early – The server is unwilling to process the request as it may be a replay.

  • 426: Upgrade Required – The client must switch to a different protocol as specified in the Upgrade header field.

  • 428: Precondition Required – The server requires specific conditions to be met before processing the request.

  • 429: Too Many Requests – Generated when the client has sent too many requests in a given timeframe, often a rate-limiting issue.

  • 431: Request Header Fields Too Large – The server cannot process the request because the header fields are too large.

  • 451: Unavailable For Legal Reasons – Access to the resource is restricted due to legal demands. It’s also a nod to the novel “Fahrenheit 451.”

  • 499: Client Closed Request – This code, used by NGINX, indicates that the client closed the request while NGINX was still processing it.

500 Status Codes – Server Error Responses Cheat Sheet

500 server errors

500 server errors

  • 500: Internal Server Error – This generic code indicates that there was an error on the server, and the request could not be completed. It means something went wrong on the server, making the requested resource unavailable.

  • 501: Not Implemented – Indicates that the server does not support the functionality required to fulfill the request.

  • 502: Bad Gateway – This error typically occurs when one server receives an invalid response from another server, such as when a proxy server is involved.

  • 503: Service Unavailable – The server is currently unable to handle the request, possibly due to being overloaded or down for maintenance.

  • 504: Gateway Timeout – Occurs when the server, acting as a gateway, times out waiting for a response from another server involved in processing the request.

  • 505: HTTP Version Not Supported – The server does not support the HTTP version used in the request.

  • 511: Network Authentication Required – Sent when the network you’re using requires authentication before your request can be processed. This often happens with public hotspots where you must agree to terms and conditions.

  • 521: Web Server Is Down – A Cloudflare-specific error indicating that while Cloudflare’s network is accessible, it cannot connect to the origin server.

  • 525: SSL Handshake Failed – Indicates a failure in the SSL handshake between a domain using Cloudflare and the origin server.

Other status codes

There is a Wikipedia article with a list of all of the HTTP Status Codes if you are interested.

How To Run a Google SERP Analysis To Increase Rankings

How to Analytics Google SERP results

How to Analytics Google SERP results

QUICK SUMMARY:

SERP analysis involves evaluating Search Engine Result Pages (SERPs) to understand the content types (organic listings, ads, featured snippets) appearing for specific keywords. This process helps determine the search intent behind queries, analyze competition, and identify ranking patterns. This guide provides a comprehensive approach to SERP analysis, enhancing your agency’s understanding and ability to leverage SERPs to drive the maximum SEO value for clients.

“Can we get our website to Google’s first page by tomorrow?”


How often have you gotten this type of outrageous client request? Sure, your agency makes things look oh-so-easy, but when it comes to a first page ranking, it’s really not.

But the fact remains that your clients depend on your expertise and guidance. After all, those SERPs are not going to conquer themselves.


You don’t have to perform SERP analysis magic or resort to a quick fix, though. Instead, it’s about having the right approach, such as conducting keyword research and monitoring the competition.


Even if results don’t happen overnight, slow and steady wins the race. Achieving long-term SERP success is a great way to demonstrate expertise and keep clients coming back for more.

In this article, we’ll explore the importance of conducting SERP analysis, all the steps involved, and how it’s used to boost rankings.

Read on to learn more about:

  • What Is a SERP Analysis?
  • 10 Types of SERP Features to Monitor
  • How To Conduct a Comprehensive SERP Analysis
  • 5 Best Tools for SERP Analysis
Adopt a Strategic Approach to SERP Analysis

What Is a SERP Analysis?


A Search Engine Results Page analysis means examining what’s displayed after inputting a target keyword into the Google search bar.


While it requires some groundwork, it’s a must-have strategy to improve your client’s SERP ranking. Here’s a breakdown of why it’s worth investing in.

Understand Search Intent A SERP analysis reveals deeper insights about user intent, such as commonly used keywords and related searches.
Scope the Competition Analyzing a competitor’s SERP presence reveals their marketing strategies and uncovers opportunities for differentiation.
Execute Keyword Research A SERP analysis helps discover user-relevant phrases, especially from SERP features like the People Also Ask (PAA) section.
Identify Top Local Businesses See the top-rated websites for specific geographic areas. This provides a realistic look at the local business landscape.
Great for Content Ideas Exploring the SERPs is a strategic way to get inspiration, expand existing strategies, and produce search-relevant content.
Determine Areas for Optimization Use a SERP analysis to identify content gaps, missing metadata, slow-loading scripts, or other optimization issues.

10 Types of SERP Features to Monitor


Before jumping into the analysis bit, it’s essential to understand the different SERP features. Here are the top ones to know.


1. Organic Listings


Organic listings are those search results that appear without any ad spend. These results are determined by Google’s algorithm, which ranks pages based on keyword relevance, authority, content quality, and user experience. If a website shows up favorably on the SERPs, it may mean the following:

  • The content piece is considered valuable, informative, and engaging to users.
  • The website has followed SEO best practices (e.g., using user-relevant keywords, rich metadata, and fast page load times).
  • Content is regularly updated and fresh, which is favored by Google (and other search engines).
  • Reputable sources link to this website, which indicates a strong backlink profile.
  • The website offers a positive user experience, such as fast Page Load Times, a high Accessibility Score, and mobile responsiveness.

Although SEO efforts take time to produce ROI, high organic search rankings lead to increased traffic rates and even less reliance on advertising.


2. Paid Listings

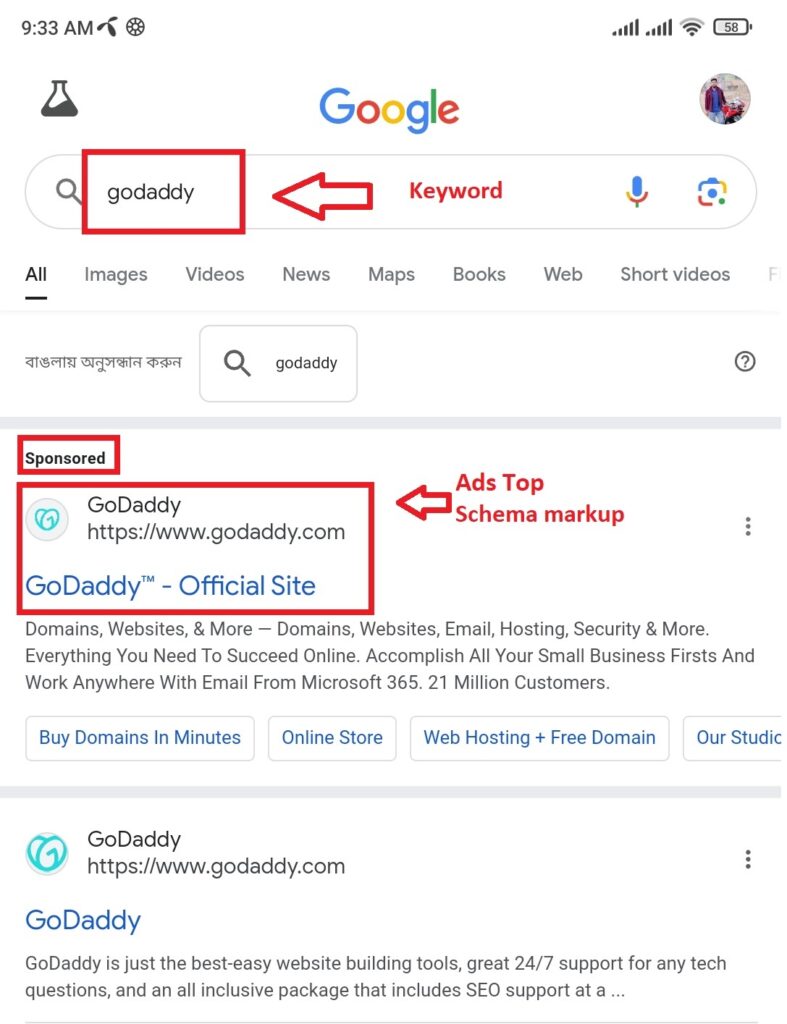
If your clients need an extra boost, paid search listings are the way to go. They’re displayed at the top or side of organic listings, indicated by a “Sponsored” subtext. Here’s an example with both of these listings below.

SEOMonirul Search Results

SEOMonirul Search Results

A paid listing is useful for:

  • Boosting website traffic quickly, which is handy for clients with limited brand visibility.
  • Getting traction for time-sensitive events (e.g., form signups for an in-person event).
  • Meeting other conversion-oriented goals (such as online sales).

While there are certainly benefits, paid search ads require strategic effort. This includes choosing an appropriate bidding strategy, setting a competitive budget, and creating a well-functioning landing page.


3. Featured Snippets


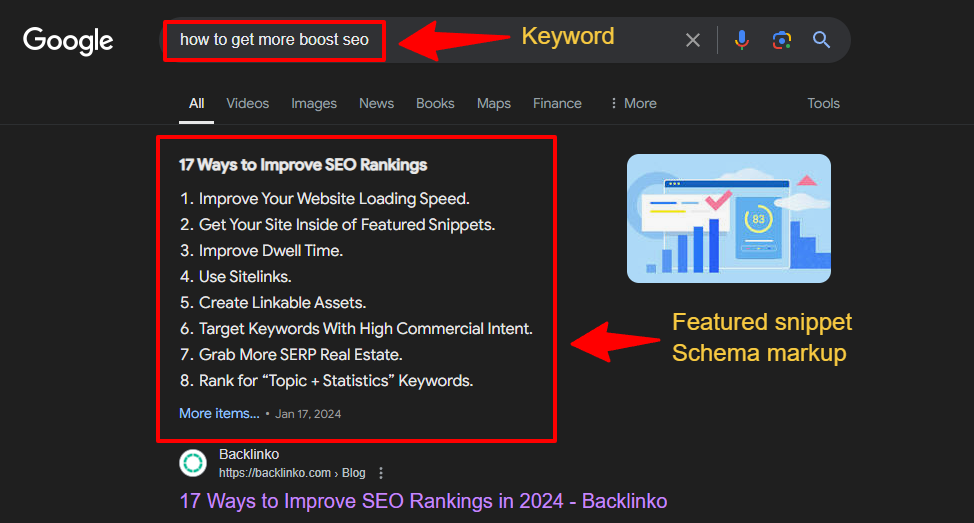
Ever seen this type of text on SERPs?

example of a feature snippet on Google

example of a feature snippet on Google

It’s a featured snippet–a concise and informative description that links to a website.


It appears above all other listings, meaning there’s high visibility and the possibility of increased Click-through Rates. This makes it one of the most desirable SERP features.

Here’s the thing–you can’t control whether your client’s website shows up in featured snippets. To increase the chances of this happening, create well-organized content that directly answers user questions.

Also known as “Position 0” on the SERPs, a Featured Snippet can get thousands upon thousands of eyes on your content! Featured Snippets are powerful, but you need to be very careful with how you go about getting them. Focus on high-quality content that is well structured, has proper schema attributed to it, and includes proper keywords to answer a user’s question.

Additionally, infuse search-relevant keywords in their content, headers, and Alt text. This makes it easier for Google to recognize and extract this information.

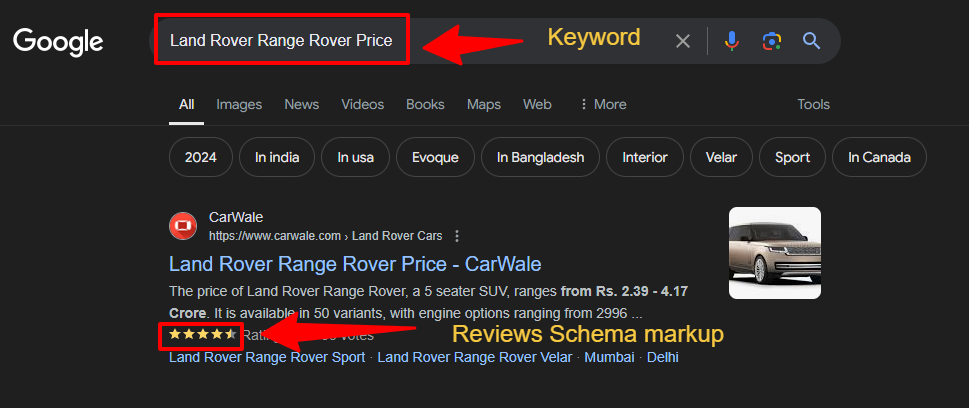
4. Rich Results


Rich results (also known as rich snippets) are additional details on a SERP beyond metadata. Essentially, they’re extra details to help users gather information quickly and choose the most relevant option. Rich results may include a variety of features, depending on the content. This may include:


  • User ratings.
  • Number of reviews.
  • Type of business.
  • Product price.
  • Delivery times.
  • Images or videos.
  • Recipe-related details (e.g., time to prepare, number of calories per dish).
example of a feature snippet on Google

example of a feature snippet on Google

Optimize for rich results by including structured data on your client’s website (e.g., microdata, JSON-LD). After you’ve completed this step, use a tool like Google Rich Results Test to see what may be displayed on search results.

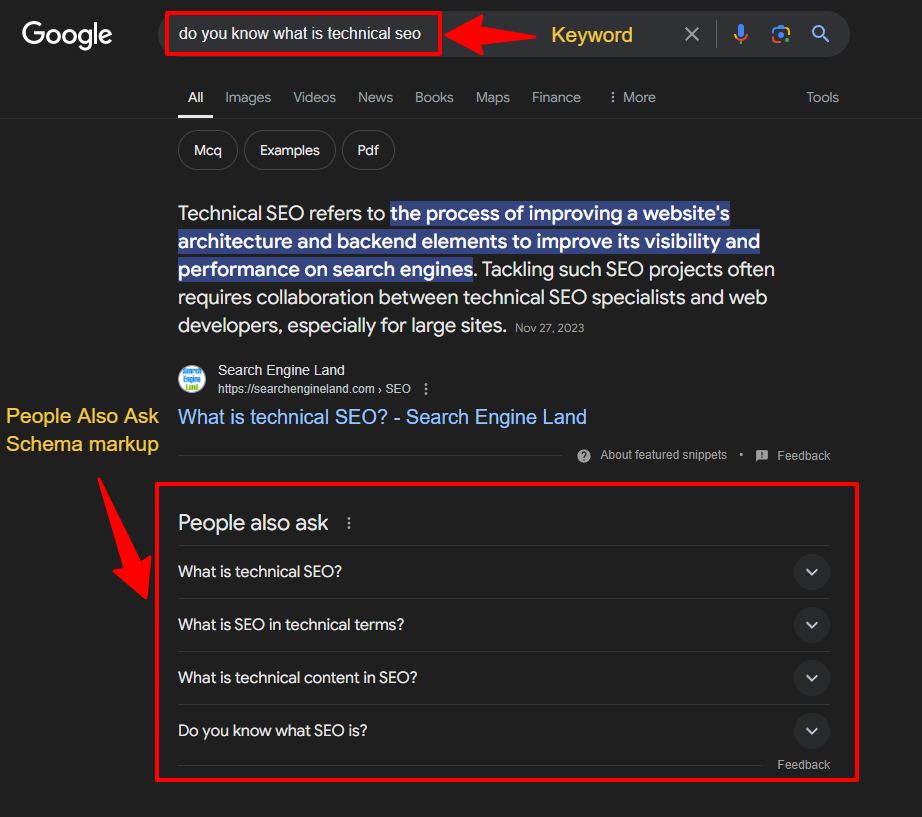
5. People Also Ask (PAA) Section


As the name suggests, the People Also Ask (PAA) section shows related questions from other users. Aside from answering anticipated questions, it’s an opportunity to explore long-tail keywords. Use this information to add keyword diversity and attract a highly targeted audience.


Clicking on any of these questions reveals a rich result with a description and website link.

Look at the “People Also Asked” questions and results to ensure your client has content depth. Users scan more than they read. However, Google needs enough meat in the content to make it relevant for the keywords and topic. Focus on the user first and the search engines second.

example of a feature snippet on Google

example of a feature snippet on Google

Similar to featured snippets, ensure your client’s content sufficiently addresses user concerns and is optimally formatted. This will increase the chances of showing up on the PAA section.

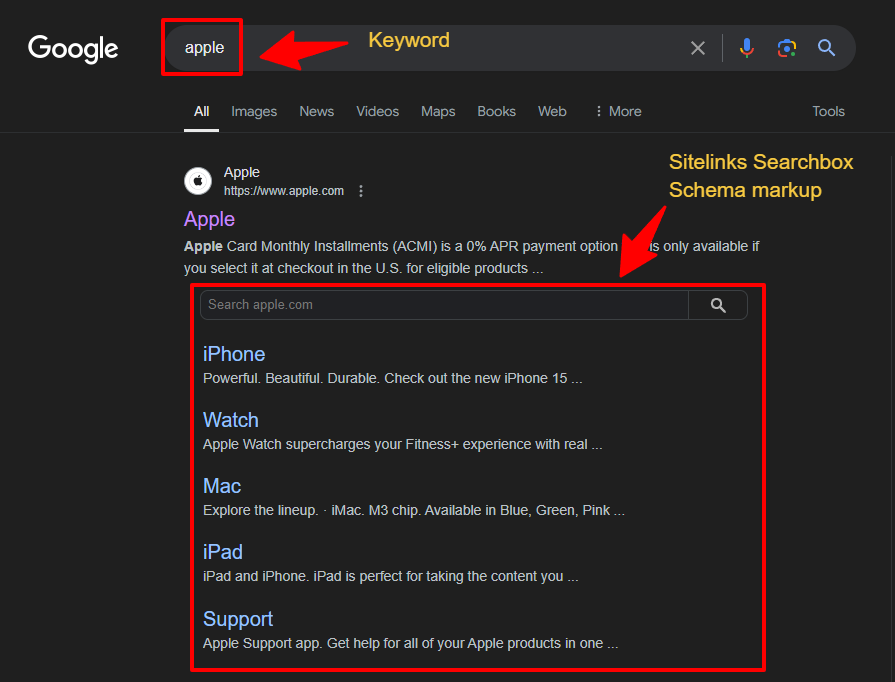
6. Sitelinks


Sitelinks are additional links to subpages of a website, displayed directly beneath the primary domain on a SERP. They offer users quick access to specific content, which saves time and effort.

Google SERP sitelinks example

Google SERP sitelinks example

Google’s algorithm automatically generates sitelinks, typically based on a user’s search query and its relevance to subpages. Since sitelinks improve SEO analytics like Impressions and Click-through Rates (CTRs), ensure your client’s website is well-structured.

Screaming Frog Essentials for Website Optimization

In the fast-moving world of digital marketing, keeping your website optimized and performing well is very important. Screaming Frog is a powerful tool that can help you with this. It helps find issues on your site that might affect your SEO (Search Engine Optimization) and user experience. This guide will show you how to use Screaming Frog to audit your website and get the most out of it.

Getting Started with Screaming Frog

1. Download and Install

First, download Screaming Frog from their official website. The installation is easy and quick. Once it’s installed, you’re ready to start auditing your website.

2. Start Your Crawl

Open Screaming Frog and enter the URL of the website you want to check into the search bar. Click “Start” to begin the crawl. Screaming Frog will go through your website, checking each page and link for different SEO and performance factors.

3. Review the Data

When the crawl is finished, Screaming Frog will give you a detailed report of your website. Here’s what you’ll find:

  • Broken Links: These are links on your site that don’t work anymore. Broken links can hurt your SEO and frustrate users. Screaming Frog will help you find and fix them.
  • Missing Meta Descriptions: Meta descriptions are short summaries of what a page is about. They appear in search results and can influence click-through rates. Screaming Frog will show you if any pages are missing these descriptions.
  • Duplicate Content: Duplicate content is when the same content appears on multiple pages of your site. This can confuse search engines and hurt your SEO. Screaming Frog will help you find and address these issues.

4. Export Reports

Screaming Frog allows you to export your findings into detailed reports. These reports are very useful for:

  • Identifying Issues: The reports will help you spot specific problems and see how they affect your site.
  • Creating Action Plans: Use the reports to make a plan for fixing the issues. Prioritize tasks and set goals for improvement.
  • Tracking Progress: Regularly exporting and reviewing reports lets you track changes and see how your SEO efforts are paying off.

Why Website Audits Matter

Regular website audits are crucial for keeping your site in top shape. Here’s why:

  • Improve SEO: Fixing problems like broken links and missing meta descriptions can improve your site’s search engine rankings. This means more people will find your site when they search online.
  • Improve User Experience: A well-optimized site makes it easier and more enjoyable for users to navigate. This can lead to higher engagement and more conversions, such as sign-ups or sales.
  • Stay Ahead of Competitors: Regular audits help you stay ahead by making sure your site keeps up with changes in search engine algorithms and user behavior. It helps you adapt and stay competitive.

Steps to Take After the Audit

After you’ve completed your audit with Screaming Frog, here are some steps you should follow:

  1. Fix the Issues: Start with the most critical problems, such as broken links and missing meta descriptions. Addressing these will have the biggest impact on your site’s performance.
  2. Update Content: Make sure your content is unique and valuable. Update any duplicate content and add meta descriptions where needed.
  3. Monitor Results: Keep an eye on your site’s performance after making changes. Regularly check your Screaming Frog reports to see if the issues are resolved and if your SEO is improving.

Conclusion

Screaming Frog is a valuable tool for anyone looking to improve their website’s SEO and performance. By using it to conduct regular audits, you can find and fix issues that may be holding your site back. This will help boost your site’s search engine rankings, enhance the user experience, and keep you ahead of the competition.

Start using Screaming Frog today to make the most of your website’s potential. For more tips on website optimization and digital marketing, stay tuned to our blog!